Grip tape is crucial in providing traction and control while riding a skateboard. Whether you’re a seasoned skater or new to the sport, learning how to put grip tape on skateboard like a pro ensures a clean, effective, and durable application. Applying grip tape to your skateboard might seem simple, but doing it right takes some skill and attention to detail. Poorly applied grip tape can lead to bubbles, rough edges, and a less-than-ideal surface, which affects your skating performance. Knowing how to put grip tape on a skateboard properly not only enhances your deck’s aesthetic appeal but also ensures a better grip, improving control when performing tricks or cruising. In this guide, we will walk you through the entire process of applying grip tape step by step. Whether you’re refreshing an old deck or setting up a new one, follow these expert tips to achieve a perfect finish every time.

What You’ll Need to Put Grip Tape on Your Skateboard
Before you begin, make sure you have the necessary tools and materials ready. Having the right equipment will make the process smoother and ensure a professional finish. Here’s a quick checklist of what you’ll need:
Having everything ready before you start helps to streamline the process and avoid mistakes. Now that you’ve gathered your materials, let’s move on to preparing your deck.
Step-by-Step Guide: How to Put Grip Tape on a Skateboard
Applying grip tape involves a few essential steps to ensure a clean and smooth finish. Let’s dive into the process.
Clean the Deck
Before applying the grip tape, make sure your deck is clean and free of any dust, dirt, or debris. Use a soft cloth to wipe down the entire surface, paying special attention to the corners and edges. If there’s any leftover adhesive or grime from previous grip tape, you can use rubbing alcohol or a damp cloth to remove it. A clean deck ensures that the grip tape adheres properly and evenly, preventing air bubbles or peeling later on. Skipping this step might cause problems with the tape’s longevity and effectiveness.
Apply the Grip Tape Properly
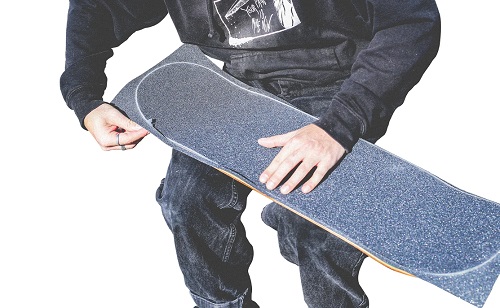
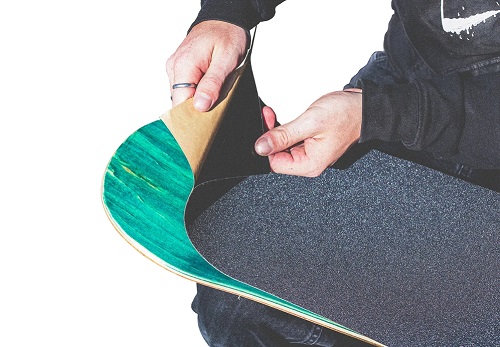
Start by peeling back a small portion of the grip tape backing. Align the tape with one end of the skateboard deck, ensuring it’s centered and straight. Gradually peel off the backing while pressing the tape down onto the deck. Use your hands or a soft cloth to smooth the grip tape from the center outwards to prevent air bubbles. Take your time with this step, as rushing may cause wrinkles or uneven application. If bubbles form, gently lift that section and reapply, or use a pin to puncture the bubble and smooth it out. Proper alignment and a smooth surface are key to achieving a professional-looking result.

Trim and Smooth the Edges
Once the grip tape is securely applied, it’s time to trim off the excess around the edges. Take a sharp utility knife or razor blade and carefully cut along the outline of the skateboard deck. Make sure to hold the blade at a slight angle for a cleaner cut. After trimming the excess, use a file or the side of a screwdriver to score along the edges of the grip tape. This step ensures the grip tape bonds well with the deck and helps prevent peeling. Run the file along the entire perimeter of the deck until the edges are smooth and sealed.
Press Down and Poke Holes
After the edges are smooth and clean, press down firmly across the entire surface to ensure full adhesion. You can use a soft cloth or a roller to apply extra pressure. If you’re applying grip tape to a deck with pre-drilled holes for trucks, use a screwdriver to poke small holes through the grip tape where the screws will go. Make sure the holes are aligned properly, as this will make attaching your trucks much easier. Pressing down the tape and making sure the holes are precise will give you a neat and polished finish.
Common Mistakes to Avoid When Applying Grip Tape
Applying grip tape may seem straightforward, but there are a few common mistakes that can ruin the final result. One of the most common errors is rushing the process, which leads to misalignment and bubbles. Always take your time to ensure proper application. Another mistake is using a dull blade when trimming the edges. A dull blade can create jagged cuts and uneven edges, making the grip tape look sloppy. Finally, failing to clean the deck before applying the tape can result in poor adhesion and peeling over time. By avoiding these pitfalls, you’ll be on your way to a professional-looking skateboard every time.
How Do You Ensure a Perfect Finish? Pro Tips Revealed
Want to achieve a flawless finish? Here are a few pro tips. First, always press down firmly across the entire surface of the grip tape, paying attention to the edges. This ensures maximum adhesion and prevents lifting over time. Secondly, use a file to rough up the edges after trimming. This helps the grip tape bond better with the deck and creates a smooth, professional edge. Lastly, if you make a mistake, don’t panic. Simply lift the tape gently and reapply—it’s better to correct it right away than leave an uneven finish. These simple yet effective tricks will help you master the art of grip tape application.
How to Fix Issues with Grip Tape After Application?
Even with careful application, you might encounter some issues with your grip tape. If bubbles form, use a pin to poke a small hole and press the air out. This method allows the air to escape without lifting the entire tape. If the edges start peeling, you can use a bit of clear adhesive or super glue to secure them back in place. Apply a small amount under the lifted area and press down until it sticks. Regular maintenance and prompt fixes can prolong the life of your grip tape, keeping your skateboard in top condition.
Conclusion
Knowing how to put grip tape on a skateboard like a pro ensures your board looks great and performs even better. By following these step-by-step instructions and using the right tools, you can achieve a smooth and durable finish that enhances your ride. Take your time, avoid common mistakes, and apply some pro tips to ensure the grip tape is applied correctly every time. Whether you’re setting up a new deck or refreshing an old one, mastering how to put grip tape on skateboard will improve your skating experience and prolong the life of your board. Applying grip tape properly not only enhances performance but also gives your skateboard a professional finish, helping you get the most out of every session.
FAQs:
Can I apply grip tape on a used skateboard deck?
Yes, but make sure to clean the deck thoroughly and remove any old adhesive or dirt before applying new grip tape.
How often should I replace grip tape on my skateboard?
Replace grip tape when it starts losing its texture, peeling, or showing excessive wear. On average, this could be every few months depending on how often you skate.
What should I do if I mess up the application?
If you make a mistake during application, carefully peel up the affected section and reapply. If there’s a bubble, puncture it with a pin and press it out to smooth the surface.
